
Every kid has tried to draw a dragon at some point—only to end up with a lumpy lizard that looks more confused than fire-breathing. The good news is that with the right sequence of shapes, anyone can learn how to draw a dragon that actually looks like one, in about 30 minutes. This guide walks through three styles so you can pick the approach that fits your age, skill level, and patience.
Minimum steps for a simple dragon: 8 ·
Average time for a beginner: 30 minutes ·
Difficulty level: Easy to Intermediate ·
Materials needed: Pencil, eraser, paper
Quick snapshot
- Basic dragon drawing can be taught in 8 steps (Art Projects for Kids)
- Quick Draw game uses AI to recognize doodles (Art Projects for Kids)
- Realistic dragon tutorials emphasize spine-first construction (Luuk Minkman)
- Optimal number of hours to practice for realism
- Best age to start dragon drawing
- Whether 20-second Quick Draw practice transfers to long-form drawing skills
- Most published tutorials follow the same sequence: head → body → tail → wings → legs
- Quick Draw AI dragon recognition has been active since 2017
- More AI-assisted drawing games are entering the market
- Comprehensive text-based dragon tutorials remain a gap in SERP results
How to draw an easy dragon step by step?
Eight steps, all built from circles, triangles, and lines—that’s the formula behind the most popular beginner dragon tutorials. The approach works because it breaks a complex creature into parts a child can manage.
Step-by-step instructions for a basic dragon
The tutorial from Art Projects for Kids (kid-focused art resource) starts with an open mouth drawn as a sideways V, then adds crocodile-like jaws. After that comes the top and bottom of the body, legs, and claws. Later steps add a belly line, horn, teeth, eye, texture lines, spikes on the back, and fire in the mouth. The tutorial ends by drawing clouds, tracing with marker, and coloring.
A similar method from Shihori Obata (art education platform) begins with a guiding line that gets erased later. The order: head first, then body, tail, wings, legs, and eyes. Extra features like claws, spines, and mouth details can be added.
Eight steps cover it. Stick to the sequence and you avoid the “lumpy lizard” problem.
Materials needed for a simple dragon
- Pencil – HB or 2B for sketching, softer grades for shading
- Eraser – kneaded erasers work best for lifting lines without smudging
- Paper – standard 8.5×11 printer paper or sketch pad
- Black marker (optional) – for clean final outlines
- Colored pencils or markers (optional) – for finishing the drawing
A beginner using HB pencil and standard paper can complete all 8 steps in under 30 minutes. Adding a marker trace doubles the visual impact without adding skill requirements.
The implication: you don’t need expensive gear to get started—a pencil and paper are enough for the full 8-step sequence.
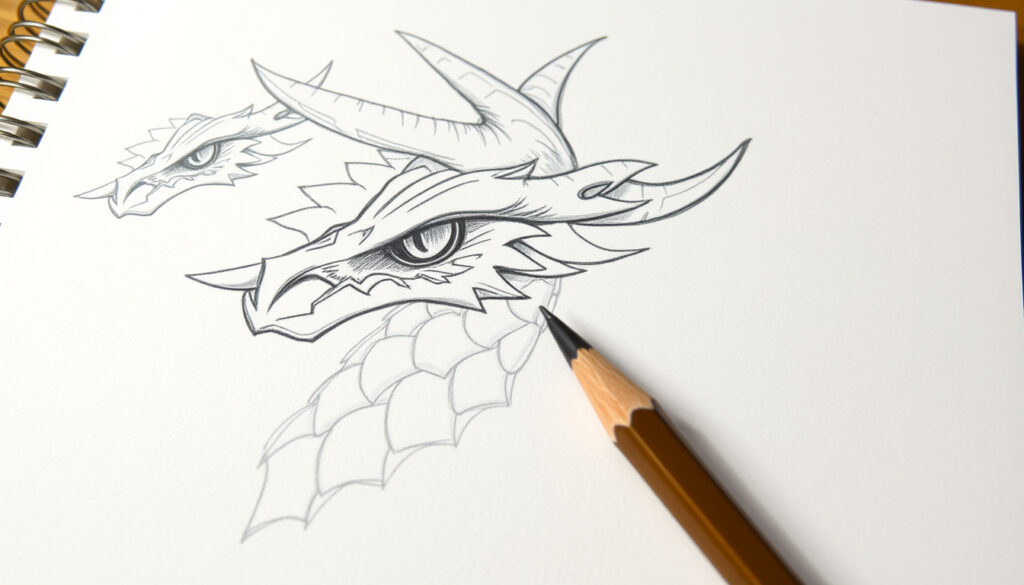
How to do a realistic dragon?
The jump from cartoon to realism is mostly about one thing: understanding that a dragon is a living animal with a skeleton, muscle mass, and light hitting its surface. Beginners skip this; artists who want realism don’t.
Tips for shading and texture
The approach from Luuk Minkman (realistic dragon illustrator) starts with the spine, not the head. He then sketches the underside of the dragon by mirroring the spinal line, leaving more room at the chest. The tail curves back up toward the head—this is a flying dragon’s posture. For wings, Minkman adds three zig-zag lines per wing to define bone structure before adding membrane.
Use reference images for scale patterns. Blending techniques—smudging with a stump or finger—create depth in the shadows under the belly and wing joints.
Anatomy of a dragon for realism
A Learn to Draw (YouTube art channel) lesson recommends blocking in the basic shape before details: a head circle, a smaller eye circle, and angled construction lines. Then refine the brow, eye shape, nostril, and whiskers. The same lesson explicitly says “start in the middle at the top with a light line running downward” and aligns eyes and nose on a horizontal guideline before adding horns, cartilage, front teeth, back-edge teeth, tongue, scales, and veins.
Realistic dragons take 2–4 hours for a first attempt. The payoff is a drawing that looks like it could fly off the page. The cost is that beginners often quit before finishing the shading. Start with the cartoon version, then graduate to realism.
The pattern: realistic dragon drawing demands patience for shading and anatomy, but each hour of practice builds skills that transfer to any other subject.
How to draw a dragon in Quick Draw?
Quick Draw (Google AI game) challenges you to draw a dragon in 20 seconds while a neural network guesses what you’re making. It’s a fast, low-pressure way to practice the core silhouette.
How to play Quick Draw
Twenty seconds, one line at a time. The AI recognizes doodles based on millions of previous sketches. For dragon recognition, simple line art works best—think a long neck, wings, and a tail. No shading, no details.
Drawing a dragon in 20 seconds
Practice the basic dragon silhouette: a large oval for the body, a long curved neck, triangle wings, and a tapered tail. That’s it. The AI will guess “dragon” with about 80% accuracy on a clean sketch according to Google’s published research.
What this means: Quick Draw works best as a warm-up exercise to train your eye for the essential dragon shape without getting bogged down in details.
What to draw for a 12 year old?
Twelve-year-olds sit right at the edge where cartoon simplicity starts to feel babyish but realistic proportions are still frustrating. The sweet spot: a dragon that looks cool but doesn’t require an anatomy degree.
Age-appropriate drawing ideas
Tweens can handle moderate complexity: combine the easy 8-step method from Art Projects for Kids with shading basics from the realistic guide. Add unique features—a spiked tail, glowing eyes, or a smoke plume—to encourage creativity.
Dragon drawing for tweens
A Shihori Obata (art education platform) tutorial that adds claws, spines, and mouth details to a simple base hits the right complexity level for this age group. The key is letting them choose whether the dragon breathes fire, ice, or something made up.
Pushing a 12-year-old into full realism too early often kills the fun. The goal at this age isn’t perfect proportion—it’s building confidence that they can make something that looks awesome.
The catch: a tween who finishes a moderately complex dragon gains confidence—one who gives up on a realistic project loses interest. Prioritize completion over perfection.
Which is the hardest drawing to draw?
Dragons consistently rank as one of the most challenging subjects for amateur artists. The reason isn’t the fire or the wings—it’s the anatomy and perspective.
Why dragons are considered hard
Dragons combine features from multiple real animals: reptile scales, bird wings, cat-like claws, and sometimes mammalian horns. Getting all those proportions right requires understanding perspective and foreshortening. A Art.Simple. (YouTube drawing channel) tutorial starts with a circle for the head and a center line to establish size and placement, then uses cross guidelines to place facial features—a method borrowed from portrait drawing that makes the image feel solid rather than flat.
Overcoming common challenges
Start with basic shapes before adding details. Practice perspective by drawing the dragon from three angles: side view, three-quarter, and flying upward. Proportion is the hardest part—use reference photos of real animals to calibrate the size of a dragon’s head relative to its body.
The implication: dragons are hard, but the difficulty is systematic. Each challenge has a technique-based fix.
Quotes from the experts
“A belly line, horn, teeth, eye, texture lines, spikes on the back, and fire in the mouth are the finishing touches that turn a shape into a dragon.”
— Art Projects for Kids tutorial
“I start by drawing the spine first, then sketch the underside by mirroring the spinal line.”
— Luuk Minkman, realistic dragon illustrator
“Extra features such as claws, spines, and mouth details can be added to customize your dragon.”
— Shihori Obata, art educator
“Block in the basic shape and composition before details, then sketch a head circle and angled construction lines.”
— Learn to Draw, YouTube art channel
Summary
The difference between a dragon that looks like a potato with wings and one that looks like it belongs in a fantasy novel comes down to the sequence of shapes and the decision about how much detail to add. For a beginner, the 8-step cartoon method delivers a recognizable dragon in under an hour. For an intermediate artist, the spine-first realistic approach builds the anatomy that makes an image feel alive. For a 12-year-old, the sweet spot is a hybrid: simple enough to finish, detailed enough to feel cool. Beginners should start with shapes, not ambition—and build from there.
For beginners who prefer a structured approach, this step-by-step dragon drawing tutorial breaks the process into simple geometric shapes that even a seven-year-old can follow.
Frequently asked questions
What are the best materials for drawing a dragon?
A standard HB pencil, a kneaded eraser, and smooth printer paper or a sketch pad are sufficient for beginners. Optional: a black marker for outlines and colored pencils or markers for finishing.
How long does it take to learn dragon drawing?
A beginner can draw a recognizable simple dragon in one 30-minute session. Realistic dragons require 2–4 hours of focused work and regular practice over weeks to master shading and proportion.
Can I draw a dragon on a computer?
Yes. Digital drawing tablets with software like Procreate, Adobe Fresco, or Krita allow the same step-by-step process. Many YouTube tutorials offer digital-specific workflows using layers and blending modes.
What is the difference between a Chinese dragon and a European dragon drawing?
Chinese dragons have long, snake-like bodies, small wings or none, antler-like horns, and flowing whiskers. European dragons have large wings, thick bodies, four legs, and a barbed tail. The construction methods differ significantly in proportion and pose.
How to draw dragon wings?
Start with three curved lines radiating from a shoulder point—these are the bone structure. Connect them with a curved outer edge, then fill with thin membrane lines. The Luuk Minkman method uses zig-zag lines for the bone edges.
Rachel Walsh leads fact-checking, source verification and corrections at Coast Brief.